
Welcome to the second post in our "testing Embedded Rust" series. In this blog post we'll cover how to test a platform agnostic driver crate.
Driver crate?
In the embedded Rust ecosystem, the term driver crate refers to a generic library that interfaces some external component (e.g. sensor, actuator) using a communication protocol like I2C or SPI. The key point here being generic: the library implementation does not contain the platform specific details of how to do I2C or SPI transactions – all those details are hidden behind a trait (Rust term for interfaces). Because driver crates are generic they can be used on a variety of platforms ranging from embedded Linux to small microcontrollers.
Most driver crates in the crates.io ecosystem are generic around the traits found in the embedded-hal crate.
This crate covers interfaces commonly found on embedded devices like Serial (AKA UART), I2C and SPI.
To use a driver crate you'll need a Hardware Abstraction Layer (HAL) that implements the embedded-hal traits; you can find plenty of HALs for microcontrollers that implement these traits on crates.io.
And if you're writing a HAL yourself, we covered how to test a HAL in one of our previous blog posts.
Project structure
NOTE: The full source code for the example covered here can be found on GitHub.
As an example, let's say you are writing a driver crate for the SCD30, a carbon dioxide (CO2) sensor which, by the way, is one of the tasks in our first knurling session about building an air quality monitor.
For driver crates, we recommend the following folder structure:
$ # instead of `exa` (Rust tool) you can use the `tree` command
$ # https://crates.io/crates/exa

$ exa -a -I '.git*' -T
.
├── Cargo.toml
├── src
│  └── lib.rs
└── target-tests
   ├── .cargo
   │  └── config.toml
   ├── Cargo.toml
   └── tests
      └── scd30.rs
The root package (./Cargo.toml) is the driver crate itself.
There's a second Cargo package in the target-tests folder; it will be used exclusively for testing.
target-tests will be configured for cross compilation using config.toml so do not put these two crates in a Cargo workspace (or you may run into build issues or Cargo bugs).
The Scd30 API
Let's start by looking at the driver crate. The core of the API will be some generic struct. The SCD30 sensor has an I2C interface so the struct will be generic around the I2C implementation.
use embedded_hal::blocking::i2c;

/// A SCD30 sensor on the I2C bus `I`
pub struct Scd30<I>(I)
where
    // ↓ embedded-hal traits
    I: i2c::Read + i2c::Write;

/// A driver error
pub enum Error<E> {
    /// I2C bus error
    I2c(E),
    /// CRC validation failed
    InvalidCrc,
}

impl<E, I> Scd30<I>
where
    I: i2c::Read<Error = E> + i2c::Write<Error = E>,
{
    /// Initializes the SCD30 driver
    /// This consumes the I2C bus `I`
    pub fn init(i2c: I) -> Self {
        // ..
    }

    /// Returns the firmware version reported by the SCD30
    pub fn get_firmware_version(
        &mut self,
    ) -> Result<[u8; 2], Error<E>> {
        // ..
    }

    // omitted methods to e.g. read CO2 levels

    /// Destroys this driver and releases the I2C bus `I`
    pub fn destroy(self) -> I {
        // ..
    }
}
Because the API is generic you can compile this crate to Linux, Windows, macOS or to a microcontroller.
Having an I2C interface (trait) enables testing the crate on your PC without any embedded hardware at all – not even a SCD30 is needed for this!
How? Using a mock implementation to simulate the I2C bus.
Host testing with mocks
The idea goes like this: you instantiate the driver with an I2C mock implementation that can run on your PC without extra hardware.
Thankfully, there's already a solution for this in the crates.io ecosystem: the embedded-hal-mock crate.
As its name suggests, this crate contains mock implementations for several of the embedded-hal traits.
In this example, we'll use the i2c::Mock implementation.
Let's say we want to test the get_firmware_version function.
The SCD30 Interface Specification (v1.0) states (in section 1.4.9) that querying the firmware version involves these 2 I2C transactions:
- A write transaction. Header:
0xC2, bytes:[0xD1, 0x00] - A read transaction. Header:
0xC3, bytes:[0x03, 0x42, 0xF3]
For those unfamiliar with I2C, in a write transaction the data flows from the host to the device and in a read transaction the data flows the other way.
In our case, the host is going to be the machine running the Scd30 driver, e.g. a microcontroller, and the device is going to be the SCD30 sensor.
In I2C, a host can communicate with multiple devices connected to the same bus (electrical interface).
To differentiate one device from another each one has a different address.
An I2C transaction (in either direction) starts with a header.
The lower bit (bit 0) of this header indicates the direction: read (1) or write (0) transaction.
The upper 7 bits of the header are the I2C device address.
If we right-shift either of these headers (0xC2 or 0xC3) by one bit (>> 1) we get the I2C address of the SCD30 sensor: 0x61.
The SCD30 response in the read transaction contains 3 bytes.
The first two bytes are the firmware version: the first byte is the major component; the second one is the minor component.
The third byte in the response is a checksum (CRC) of the first two bytes.
The firmware version of the SCD30 is always 3.66, in MAJOR.MINOR format, according to the Interface Specification (v1.0) document.
Now let's see how to use the mock to test this functionality.
// this code lives inside a `tests` module

use embedded_hal_mock::i2c;
use super::{Error, Scd30};

#[test]
fn firmware_version() {
    let expectations = vec![
        i2c::Transaction::write(0x61, vec![0xD1, 0x00]),
        i2c::Transaction::read(0x61, vec![0x03, 0x42, 0xF3]),
    ];
    let mock = i2c::Mock::new(&expectations);

    let mut scd30 = Scd30::init(mock);
    let version = scd30.get_firmware_version().unwrap();
    assert_eq!([3, 66], version);

    let mut mock = scd30.destroy();
    mock.done(); // verify expectations
}
To create the I2C Mock we need to pass in some expectations.
These expectations are the I2C transactions expected by the mock.
We'll only test the get_firmware_version function here so only 2 transactions are expected.
Note that first argument of the Transaction constructors is the SCD30 I2C device address, not the header of the transaction.
Once we have an I2C mock we can instantiate the Scd30 driver with it.
We'll then call the get_firmware_version method on the driver and assert that it returns version 3.66.
Once we are done using the mock we need to call its done method.
This method verifies that all the expectations were used; if they were not, the method panics which fails the test.
The i2c::Mock will also panic if you try to perform a transaction not listed in the set of expectations it was constructed with.
If you cargo test your crate and correctly implement the get_firmware_version method then the above test should pass!
Failure modes
The cool thing about using a mock is that you can simulate failures that would be hard to produce with real hardware.
For instance, it's unlikely you'll be able to make the SCD30 sensor report a bad checksum in its responses and it would be hard and costly to inject interference in the I2C bus to flip some bits in the sensor response.
But with a mock you can easily simulate these errors and verify that your driver crate behaves correctly in these scenarios.
Let's see how to do that for the get_firmware_version API.
#[test]
fn firmware_version_bad_crc() {
    let expectations = vec![
        Transaction::write(0x61, vec![0xD1, 0x00]),
        // NOTE negated CRC byte in the response!
        Transaction::read(0x61, vec![0x03, 0x42, !0xF3]),
    ];
    let mock = i2c::Mock::new(&expectations);

    let mut scd30 = Scd30::init(mock);
    let res = scd30.get_firmware_version();
    assert_eq!(Err(Error::InvalidCrc), res);

    scd30.destroy().done(); // verify expectations
}
Here we have a test that's similar to the previous one but includes a fake error in the SCD30 response: the third byte, the CRC, is negated, meaning all its bits are flipped.
This should be detected as an error by our Scd30 driver because the checksum is invalid so this time we assert that get_firmware_version returns an InvalidCrc error.
Don't rely solely on mocks
The fact that you can use mocks to test the driver crate code does not mean that should exclusively use mocks to test your code. Wherever possible you should extract the parts of your code base that are pure, meaning they do not perform side effects like I/O. These parts can then easily be tested using stock testing functionality - without the overhead of using mocks.
A great example of this in the SCD30 driver crate is the checksum functionality. All responses from the sensor include a CRC8 checksum; the Interface Specification document describes how to compute it and includes some examples. In this case, you can refactor the CRC computation into a helper function that's used in functions that involve I2C communication. The helper function is pure: it takes some bytes and returns one byte, so it can be tested in isolation without mocks.
fn compute_crc(bytes: &[u8]) -> u8 {
    // ..
}

#[cfg(test)]
mod tests {
    #[test]
    fn crc() {
        // example from the Interface Specification document
        assert_eq!(super::compute_crc(&[0xBE, 0xEF]), 0x92);
    }
}
Target testing with defmt-test
Now it's time to confront the implementation, so far only tested on the host, with reality.
The idea is to instantiate the Scd30 drivers with one of the existing HAL crates, instead of a mock, and test that.
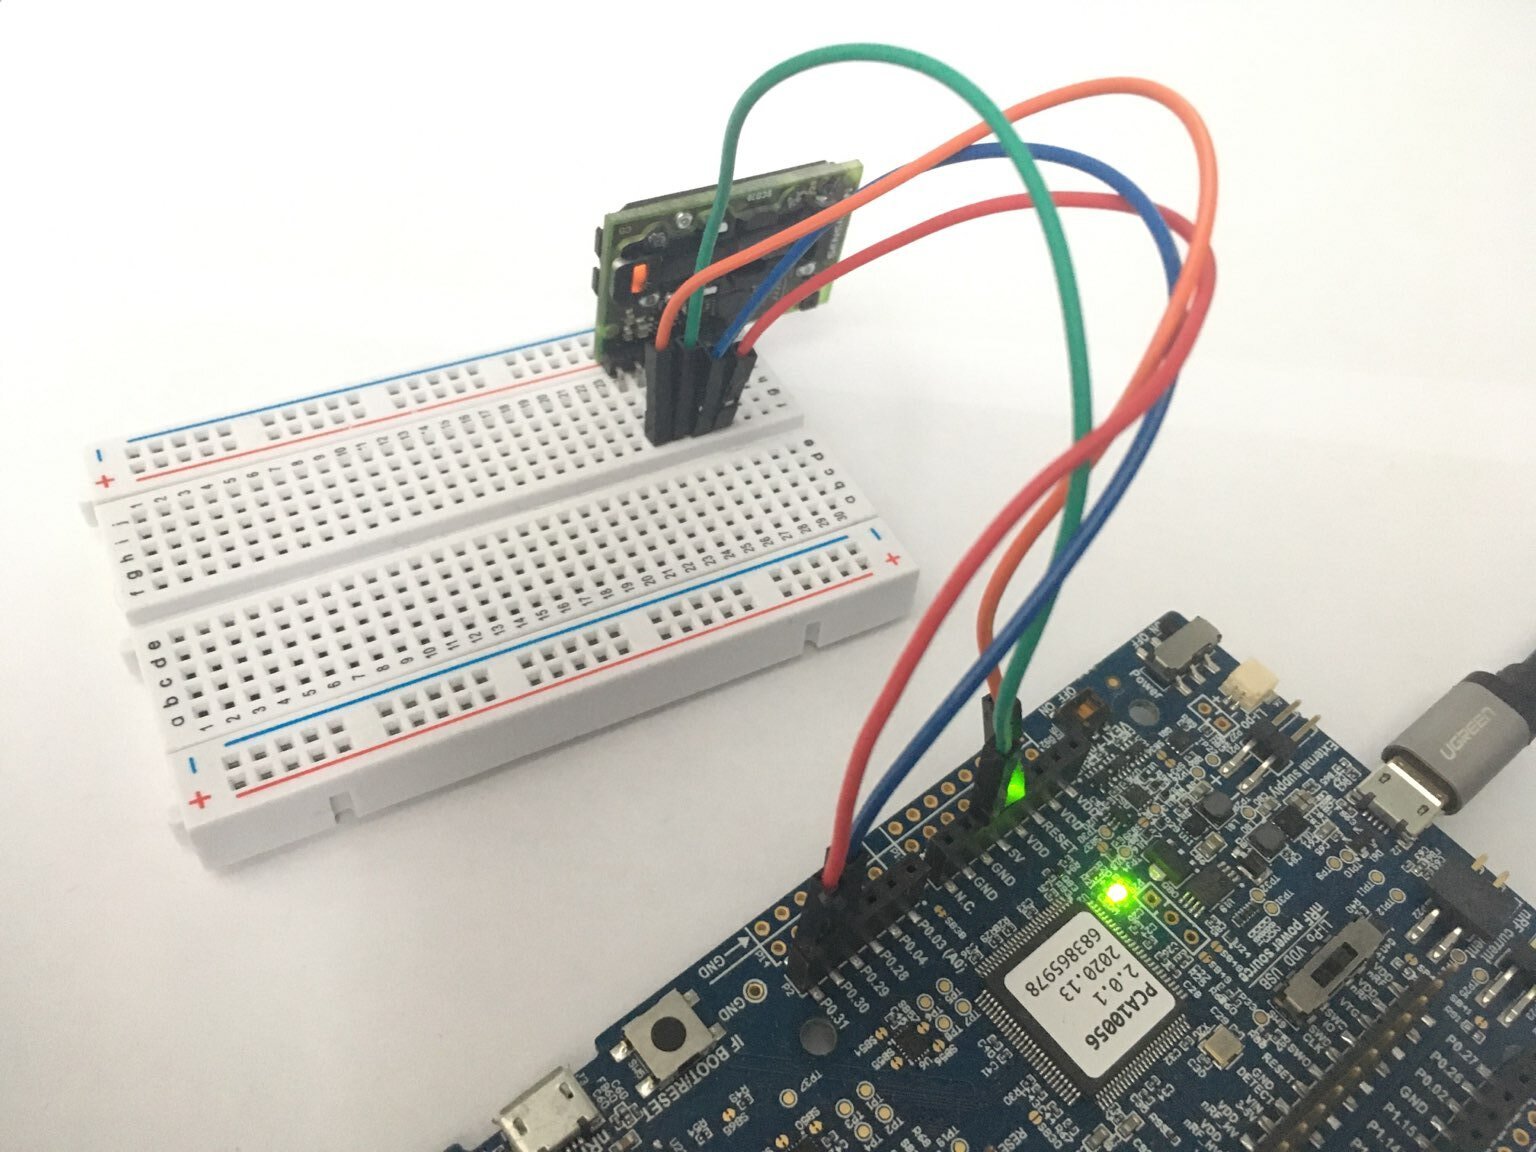
This part requires actual hardware: in this example, in addition to the SCD30 sensor we'll use the nRF52840 Development Kit (DK).
These real hardware tests will live in the target-tests folder we previously created.
That folder is configured for cross compilation and set up with probe-run and defmt-test for on-target testing.
We'll use the same setup as in our previous blog post so we won't repeat those steps here.
We have wired the dev board and the SCD30 as follows:
- nRF DK 5V <-> SCD30 VIN
- nRF DK GND <-> SCD30 GND
- nRF DK P0.30 <-> SCD30 SCL
- nRF DK P0.31 <-> SCD30 SDA
Below is the HAL configuration of the nRF52840 microcontroller on the development board.
struct State {
    scd30: Scd30<Twim<TWIM0>>,
}

#[defmt_test::tests]
mod tests {
    use defmt::{assert_eq, unwrap};
    use nrf52840_hal::{
        gpio::p0,
        twim::{self, Twim},
    };

    #[init]
    fn setup() -> super::State {
        let peripherals =
            unwrap!(nrf52840_hal::pac::Peripherals::take());
        let pins = p0::Parts::new(peripherals.P0);
        let scl = pins.p0_30.into_floating_input().degrade();
        let sda = pins.p0_31.into_floating_input().degrade();
        let pins = twim::Pins { scl, sda };
        let i2c = Twim::new(
            peripherals.TWIM0,
            pins,
            twim::Frequency::K100,
        );

        let scd30 = scd30::Scd30::init(i2c);
        State { scd30 }
    }
This one of the tests: it checks the firmware version of the SCD30.
    #[test]
    fn confirm_firmware_id(state: &mut State) {
        const EXPECTED: [u8; 2] = [3, 66];
        let firmware_id =
            state.scd30.get_firmware_version().unwrap();
        assert_eq!(EXPECTED, firmware_id);
    }
}
Now, don't be surprised if the driver implementation works with real hardware on the first try! It happens often if you test it with mocks first, in our experience.
How should one go about testing the rest of the Scd30 API that involves operations like reading the CO2 concentration?
There's probably not an expected response when testing the rest of the SCD30 functionality but simply asserting that the rest of the API returns Ok and not e.g. blocks forever or returns some I2C or CRC error is a great start.
In the case of the CO2 concentration, you could assert that the returned f32 value is within some reasonable range (e.g. less than 1,000 parts per million indicates good air exchange in indoor spaces) and that is not a NaN value or infinity.
Conclusion
In this post we have seen how to test a driver crate without additional hardware using mocks and with embedded hardware using (defmt-test) on-target tests.
So far in this post series we have seen tests that run on the host (the build machine) and tests that run on the target (e.g. a microcontroller). In the next blog post we'll introduce a third type of testing that's useful in the context of testing complete embedded applications.
Sponsor this work
Knurling-rs is mainly funded through GitHub sponsors. Sponsors get early access to the tools we are building and help us to support and grow the knurling tools and courses. Thank you to all of the people already sponsoring our work through the Knurling project!


